How to Mold and Cast Climbing Holds
Making a Silicone Mold:
Materials needed to make a mold:
- Master part (part that needs replicating)
- RS-9225 silicone material
- Painters mixing stick or drill with paddle mixing bit
- Vacuum chamber for degassing or pulling air out of the material is optional but recommended
- Hot glue gun and glue sticks
- Super glue
- Flat surface for constructing mold box
- Mold box materials, wood, foam core, cardboard, mixing cup, Tupperware container
- Xacto knife
- Digital read scale with at least one decimal place, two is preferred
RS-9225 is a 25 Shore A Tin Silicone with a mix ratio by weight of 10 parts White Base material to 1 part Blue Activator. It will cure, or harden, on just about anything moldable in about 8-12 hours. If pouring the mold at a cool temperature, this curing processes can take longer and if it’s hot, it could be much less.
Once the master part is clean, dry, and dust free, place the master on a flat surface such as a piece of wood or acrylic. Melamine plywood is a great choice because of it’s smooth white finish creating a non-stick surface.
If planning to mold something light weight or low density, use hot glue or super glue to secure it to the flat surface to avoid it floating to the top when the liquid silicone material is poured into the mold box.

Creating A Mold Box
Creating a mold box around the master part can be done in many ways. Foam core, cardboard, mixing cups, or Tupperware containers can all be used to create a mold box around the part to be molded. White foam core from the hobby store is a great option because it’s inexpensive and has a smooth surface. It can be scored with the xacto knife and folded into custom geometric shapes to conform to the outline of the master part. Be sure not to score completely through the foam core which could create a leak in the mold box. Leave a 1/2”-3/4” distance between the master part and the mold box walls for silicone. Hot glue is always a good way to prevent the mold box from leaking and secures it well to the flat surface. Once the mold box is completely sealed with hot glue and secured to the flat base, the silicone material is ready to be mixed and poured.
Making A Silicone Mold
RS-9225 has 30-45 minutes of work time depending on how much material is being mixed and the temperature of the material. Room temperature around 72-75 degrees is preferred. If mixing a large amount of material at once, the higher volume of material in the container can make the material cure quicker and decrease the work time.
To properly determine how much material is needed to fill the mold box, take the area of the mold box, multiplied by 0.04, and multiply that one more time by 454. That will equal the amount of White Base material needed. For example, if a mold box is 3 inches wide, 4 inches long, and 2 inches high, the equation is as follows:
3x4x2 = 24 multiplied by .04 =.96 multiplied by 454 =436 grams of White Base silicone to be used for pouring the mold. In addition to the White Base material, mix in 43.6 grams of Blue Activator. (10:1 mix ratio)
Place the mixing bucket on a digital read scale. Carefully pour the desired White Base material into the mixing container to the weight determined above. If using a vacuum chamber, it’s a good idea to leave 3/4 of the container empty to allow the material to rise in volume as the air in the material is being degassed. If no vacuum chamber is available, the amount of material in the mixing container shouldn’t be more than half full. The mix ratio of the RS-9225 tin silicone is again, 10:1. If measuring 1000 grams of White Base material, then carefully measure 100 grams of the Blue Activator. Mix slowly at first to not splash the thinner, lower viscosity Blue Activator. Wearing safety glasses, gloves, protective clothing is required when hand mixing material. If mixing larger amounts of RS-9225, a drill with a paddle bit or jiffy mixer machine can be used to quickly mix the silicone.
The material colors are helpful to identify when the material is fully and properly mixed. Mix for 2-3 minutes until there is no longer any White Base material at the bottom and sides of the mixing container and the silicone is a consistent light blue color. A clear mixing container is helpful to see when the silicone is fully mixed and there isn’t any unmixed material toward the bottom of the container.
When the silicone is fully mixed, pour it slowly toward one corner of the mold box. Pouring slowly will allow the material to fill the mold box without trapping air bubbles in fine features and produce good results. Only fill the mold box enough to cover the master part by a ½” or so. Tapping the mold box on the table or a vibrating table will allow the bubbles to rise to the top. Let the poured mold sit on a level surface overnight before demolding.
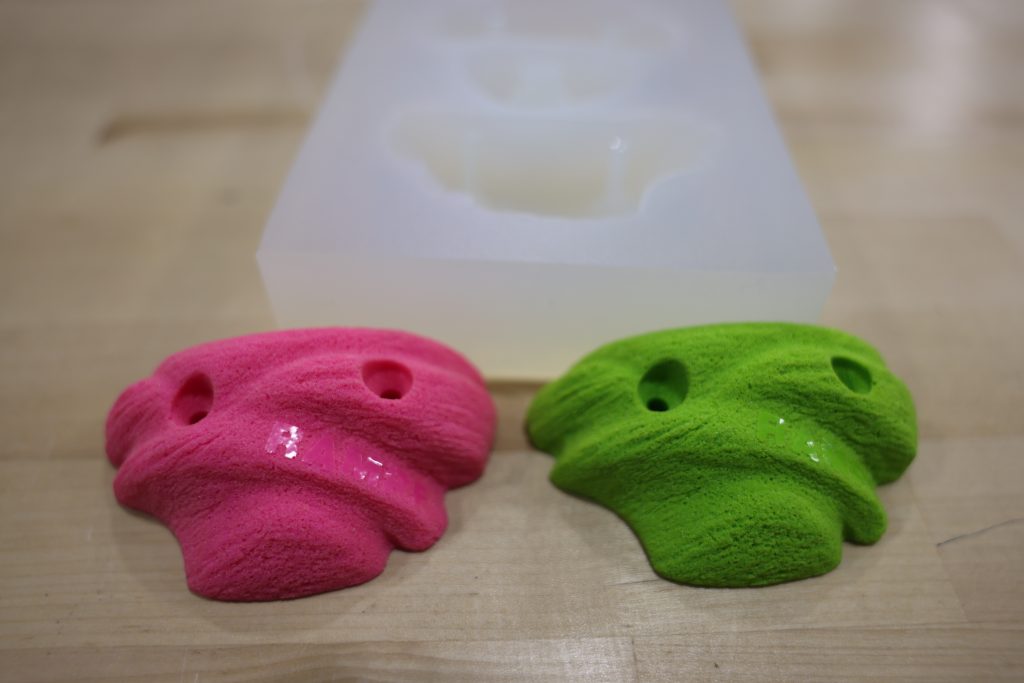
Once the mold is fully cured and hardened, carefully remove the mold box. Before taking the master part out of the silicone mold, take an xacto knife and carefully trim any flash of thin silicone that might have leaked under the master part to clean up the edge. Remove the master part by flexing the corners of the silicone mold. It’s better to flex the silicone away from the master part than to try and pull the part out of the mold. It will preserve the texture and fine details captured by the silicone mold.
Once your master part is out and the flash is trimmed away, the mold is ready to produce parts. Mold release is helpful to condition the silicone mold surface and allow more parts per mold. This step is completely optional if only casting small amounts of parts. If using mold release agents, spray a quick dusting of mold release over the surface of the mold. Be sure to not build up a shiny surface using too much release agent.

Casting Your Climbing Hold
The climbing hold polyurethane is IE-3092. It’s an easy to process, room temperature cured material. It’s very thin in viscosity making it easy to mix and pour. There is an antimicrobial additive in it that helps combat bacteria growth on the cured urethane cast part as well as a UV stabilizer allowing it to maintain its bright color on the wall over time.
Shake the A side and B side of the IE-3092 thoroughly to be sure nothing in the material has settled, especially the B side (Polyol side) where the pigment is added. Carefully measure out the A side and B side into separate mixing cups using a digital read scale. If a scale is not available, the material ratio is 1:1 by volume. Please be as accurate with the mix ratio as possible to ensure proper curing and achieve strong physical properties. If measuring A side and B side with a digital scale, the mix ratio is 100 A side (ISO) to 90 B side (Polyol) by weight. Measuring the material into separate cups avoids over pouring one material into the other. Once the A side cup and B side cup are properly measured, pour the A side cup into the B side cup and mix for one minute. Be sure to scrape the sides and the bottom of the cup well to be sure all material is properly mixed. Because the material is very thin, protective eye wear is required to prevent splashes when mixing.
The working time of the IE-3092 is roughly 10 minutes. That will be plenty of time to mix for one full minute and slowly pour material into the silicone mold. Be sure to pour slowly down one side of the cavity to allow the material to flow throughout the mold and avoid trapping air bubbles. Be sure to fill the mold just sub flush to the top of the mold. This will help when sanding the bottom side of the cast part. Allow the mold to sit on a level surface and allow the material to harden for at least 45 minutes to an hour. If a pressure tank is available, place the mold carefully into the pressure tank and apply 60 psi of pressure to eliminate any air bubbles in the material. This step is optional.
When the part is fully cured, demold the cast part the same way the master part came out of the mold. Bend back the corners of the silicone mold and allow the cast part to release from the silicone. The first cast part may have some dust or debris from the master part embedded in the surface, but this will clean out the mold for the second pour. The second pour is always the nicest and recommended to save the cast part to be used as the next master part, if planning to make more molds of the same part.
A little sanding of the sides and the back side will be necessary.
